

Space-saving built-in library
Space-saving built-in library
If you live in an apartment, a small area or you are a fan of the book, and will definitely need a space for books. In most cases, and additional space for books is always the demand for homes seems to run out quickly.

A simple way to address this problem is to provide library space, and built in library that gives you enough space for books and magazines. You can create a library to cut a piece at the end of the Treasury and the installation of the shelves.
Create a 9 "deep x 18" wide x 40 "cabinet highest you can easily create space for books, and without occupying every inch of ground or wall space. E 'can save library space is devoted to complete and furnish the room, and you can choose the size and, finally, to improve the look of your room.
Storage space. From the cellar to the attic, and I have traveled every square inch of space research to be able to transform the store. However, I learned that sometimes the answer is right in front of you.
Some years ago, my son Chris ran out of shelves for her growing collection of books. But with 10'x 12 'room that has a bunk bed, desk, computer, stereo cabinet, and two large windows, closet, and then there is no room for a stand-alone bookcase or wall shelf. Then I stumbled upon a new idea:
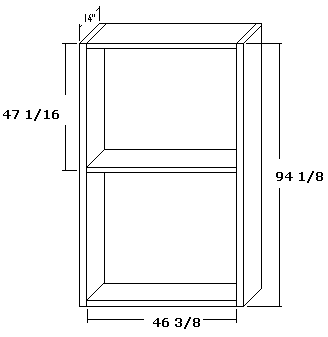
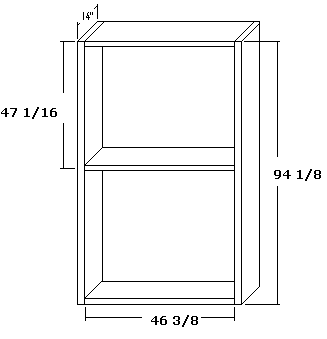
I cut through a hole in the wall of the end of his room and install the built-in library. In the library is not just about 9 "deep x 18" wide x 40 "high, but four shelves hold many books. Above all, do not take even one square inch of surface.
It was built in library in the period from 1 "× 10" pine and used 1 / 4 "plywood to return. Shelves are laid down in defeat nuts on both sides. Libreria after screwing into a hole in the wall of the room, and cut around cased Colonial to give the project a clean, built-in look.

The recommended materials are 3/4" hardwood plywood (oak, maple, cherry, etc.) and the matching hardwood trim, 1"x3". Materials list:
6 Sheets - 3/4" Hardwood plywood; 4'x8' for six sides, top/bottom panels and shelves.
3 Sheets - 1/8" matching hardwood plywood; 4'x8' for back panels.
2 Pieces - 2x4x12' pine for the bottom base plates.
4 Pieces - 1"x3"x12' hardwood for the horizontal finish trim pieces, and support bracing.
4 Pieces - 1"x3"x8' hardwood for the vertical finish trim pieces.
5 Pieces - 1"x3/16"x12' hardwood, doorstop strips to be used for the front edge of shelves.
60 Pieces - 2" wood screws.
60 Pieces - 6d finishing nails.
1 tube - wood glue.
12 Pieces - 4' metal shelving slotted standards with shelving clips.
1. Prepare the site. Measure the space where the wall unit will sit. Remove all molding in the required space. Locate all studs in the wall and transfer the marks on the ceiling 14 1/2" out from the wall (you will use these markings to secure the shelving unit to the wall studs).

No comments :
Post a Comment